Archive | April 2016

4/29/16

IMG_2794.JPG

Tonight was another salad day, which was surprisingly still very educational. As you can see, it’s a lot more colorful than the spinach-strawberry salad I made. It felt nice to be more creative this time. We shopped for ingredients at Costco and my mom gave me full freedom. As she says whenever I make dinner, “All my call.”

  1. Until today, I always thought that cutting up lettuce was a challenge. Prior to the very first salad I made, the ingredients never really…clicked, you know? They were always messy, which, I know, doesn’t make sense because it’s a salad–you gotta toss it to enjoy it. It just never really felt right. No idea how it actually “clicked” this time, especially without a recipe to follow, but it did.
  2. Adding (vegetable, not black) peppers was a last-minute Costco decision–you’re there, so you decide to try a few things.
  3. I also remembered what my brilliant idea was from yesterday: hard-boiled eggs. Of course, today though, I forgot to add them, but there’s always tomorrow.
  4. Those aren’t actually bell peppers, I don’t think. That was my intention, but I opted to go for the smaller peppers. The reason why I chose bell peppers for the salad was because I learned how to properly chop them…from a cooking game I play on my phone. I don’t know how I didn’t realize it before since I’ve been playing it for years, but that’s what happened.
  5. And, FYI, when you’re working with raw meat, make sure that their essence doesn’t touch the fruits and vegetables. Or else you might transfer food poisoning. My mom was a stickler about that. If you can, wash a cutting board and knife if you need to use it again, while still cooking. Yeah, she was pretty serious about it.
  6. Speaking of sticklers, I wasn’t quite sure how much of each ingredient to add, since I wasn’t following any recipe this time. Here’s what I went with and, since I’m so picky about having whole or even things, this recipe should be easy to follow: one of each color tomatoes, which makes about eight tomatoes total (I got a bag of the small, multicolored ones, just for looks); two small peppers; one head romaine lettuce; two cups strawberries (quartered like last time); half of one cucumber; and one chicken breast.
  7. Since the breast from Costco was so big, I actually cut it in half. The long way. Which was actually pretty easy considering how frozen it still was. I mean, it had thawed out for the most part, but still solid at the center.

I didn’t make the dressing this time. We still have three or four bottles left of different types of dressing. Personally, I went with Panera Bread’s Fuji Apple Vinaigrette Dressing.

Tomorrow, we plan on having steak. I forgot the name of it, but it’s a new type that we’re trying. All I know is that it looks like a meat Cinnabon. As sides, I’m also adding rice and green beans, because, if you didn’t already know, that’s my favorite meal. In fact, if I were on Death Row, this is what I would ask for as my last meal.

Although maybe I should substitute the rice with mashed potatoes instead. Actually mashing them is actually a very entertaining process. At the same time, I feel like doing so would Americanize the meal. Not that it’s a bad thing, of course, but having rice with an American favorite? That’s sort of become our thing, you know?

4/28/16

This week, since my dad has been working, my mom decided to make dinner all week because I suppose he deserves dinner made by a person with more experience when he works all day. It was okay though; I had to look up more recipes anyway, so it’d just give me a break. We settled on letting me make lunch though.

On the first day, however, lunch turned into dinner. I had a bagel for my actual lunch, but I was still hungry, so I figured I could use a healthy snack. Rather than fruit, I opted to make myself a salad. It wasn’t anything new (I’d made it once or twice before) except this time, I chose to experiment with a variation of a few ingredients:

  1. Rather than spinach, I preferred lettuce.
  2. I also tried to find the chicken breasts that were closest to the recipe. I suppose it turned out to be double the ones I needed, because they took twice as long to cook. (Actually, thrice as long–I cooked it as long as they told me to and then doubled that number once I saw how very raw it still was. Although, in the recipe, it says 2 (4 oz.) chicken breasts. I never really understood if that meant 4 oz. total or per breast. I assumed total, but there was nothing like that at the store, no matter how many times I had to use an online converter.
  3. Speaking of cooking the chicken, it turns out there is such thing as too much oil. I kept getting hit with the pops as I tried to flip the meat. Huh, I just noticed this in the instructions: “Coat pan with cooking spray. Add chicken to pan, etc.” Not oil. Spray. Whoops.
  4. It turned out that even with the one bag of freshly cut lettuce I bought, the dressing was scarce, so I had to make another batch. Not that that’s a huge deal: it literally takes 15 minutes.
  5. I didn’t use red onion this time, because, I mean, I don’t like ’em.
  6. Nor did I use cheese. I was going to use the leftover Parmesan from Tomato Bisque day, but forgot to apply it.
  7. I also forgot to add the salt, pepper, and paprika onto the chicken prior to setting it in the pan. I sort of added it while the first side was cooking. When it was time to flip, I added the ingredients to the other side as well. Once it was supposedly finished, I flipped it over again to, I don’t know, let the spices dissolve in the meat or whatever happens. Then, see how cooked they were, I cut one in half and the center was still very much uncooked. I then based the rest of the cooking on how far those gaps went and tested it again by applying another cut next to the one already made. Tested the other piece, and then I was golden. I cut the rest of the chicken that way–julienne–and made sure that the breast-shape was still intact, just so it still looked professionally made.
  8. I think the strawberries were my favorite part. I actually looked at the carton from all angles and made sure they felt right. Also, I think I have a way to tell which ones are freshest: If there’s some kind of fogging as you hold the carton, I guess that means it’s been recently washed. Not quite sure though; I’m still figuring it all out. It was a really good batch I picked though. Not a single bad berry.
  9. I also cut the strawberries in half twice instead of the usual one-time deal. I feel like it was better, for some reason. I guess it had to do with the portions once they became an actual part of the salad.
  10. Piece of advice though: when you’re making the dressing, make sure to actually use a medium bowl, not a small one. Makes mixing the strawberries more of a challenge. Not impossible, but it’s a lot more fun to toss the fruit around the dressing by hand, isn’t it?

So here’s the original photo: Strawberry Chicken Salad with Pecans Recipe

And here are the shots of my creation:

  1. DressingIMG_2786
  2. Con EnsaladaIMG_2785
  3. Con El PolloIMG_2788

(There’s a chance that my Spanish is wrong, but I only remember, like, 10% of my Spanish. I can recall certain words, but don’t ask me grammar stuff.)

Don’t mean to toot my own horn, but…yum…

Not only that, but my dad wants salad for the rest of the week, but with embellishments and variations. So I’m thinking of adding sliced ham next time? I suggested bacon bits, but he doesn’t like bacon. His favorite salad dressing is Thousand Island apparently, so I’m looking up the easiest recipe for that, although it’s apparently just ketchup and mayo.

I bought French bread while I was getting strawberries earlier, because we still had leftover Seabiscuit. (Get it? Sea bisque-it? Salty bisque? Yeah, that was bad, I know.) I considered using that to make my own croutons, but I don’t know. What do you think?

Okay, either I just thought of a really good idea for the salad, but forgot it, or it was the French bread thing. No, I think it was an actual idea. Something to do with substituting the fruit, I believe…

I don’t know, but maybe I’ll add sliced bread as a side thing to the salad though.

I still want to remember what this brilliant substitution was. Oh well. I suppose I’ll publish this right now and then, if I think of it, add it as a side note, or post it in tomorrow’s entry.

In the meantime, if any of you readers out there have ideas of your own, I’m definitely open to suggestions! 🙂 Just post a comment below!

4/26/16

Today I made tomato bisque from a NY Times Cooking recipe called “Tomato Bisque with Fresh Goat Cheese”. I chose it because it was the easiest one that I found. Of course, “easiest” doesn’t always mean that it actually is easy. There a few questions that I would like to address:

  1. Is the top of the saucepan supposed to be on when you’re leaving it to simmer for half an hour?
  2. Did it have to be “Italian plum tomatoes”? The can I found was the Signature Kitchens Crushed Tomatoes in Rich Purée. It was the only “crushed tomato” option I could find, but I think it worked.
  3. Our family is strongly against goat cheese, so I looked up what I could substitute for it, which was cream cheese–I could use the exact same amount. Then, my source said that if I wanted to maintain a similar texture, I just add a little bit of plain yogurt.
  4. Are they sure that you’re supposed to put it on medium-high heat? The first three ingredients burned very quickly and it didn’t take me long to add the other ingredients this time. In fact, they told me to wait 1-2 minutes. Well, within half a minute, it started to burn.
  5. I think there’s too much salt. My dad, whom I was making this for, watched me prep the salt and he literally pointed out that it was too much. I was only following the recipe though. Is there something I could add to it to save it, do you think?
  6. The bread is good though. Okay, I bought it from Safeway, but it’s good.

I think the recipe itself is fine, just needs a few tweaks. Step one would be to reduce the amount of salt. 1 tbsp. is way too much. I think I’ll just add 1 tsp, and if it’s not enough, I can always add more.

On the plus side, I used a blender for the first time! You can imagine how much of a blast the puppies had, hearing it work.

I’m reading the reviews on here and they’re mostly positive. How? Are they not tasting the extra salt? Did I misread the amount?

Wait…I think I did get the wrong tomatoes after all. Apparently, you need more in order to get the equivalent amount of plum tomatoes, according to one reviewer. Damn substitutions due to convenience.

So here’s what it looks like on the website: 01CHEESE4-articleLarge.jpg

And here’s what I made: IMG_2766.JPG

4/24/16

Whenever I watch Hell’s Kitchen, there’s always an episode where Chef Gordon Ramsay says something about a risotto. I even memorized how he pronounces it with his British accent: “Ri-ZOT-toe”. (You said it out loud, didn’t you? Make sure you got the accent down, too. It’s pretty fun, right?) Since then, I’ve always wanted to try it. Looking at the finished product on TV, I saw that it was some kind of porridge made from rice.

Making it though, I was surprised that it was less about the rice and more about getting it to soak. How do you do that? Chicken broth. Lots and lots of chicken broth.

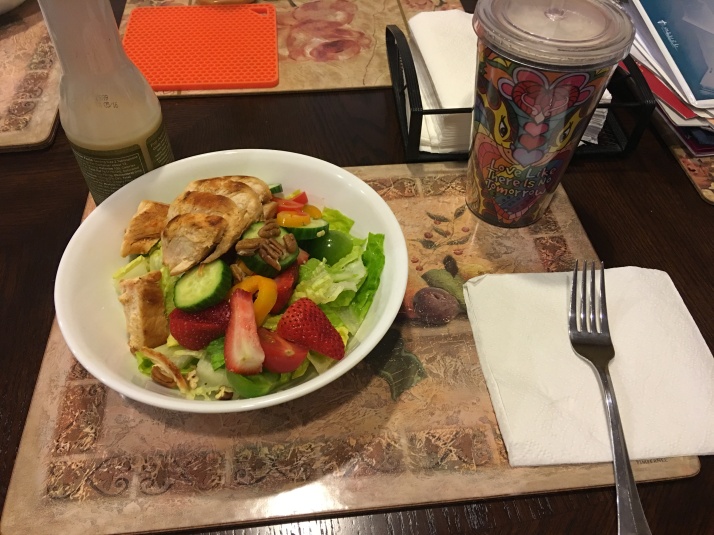
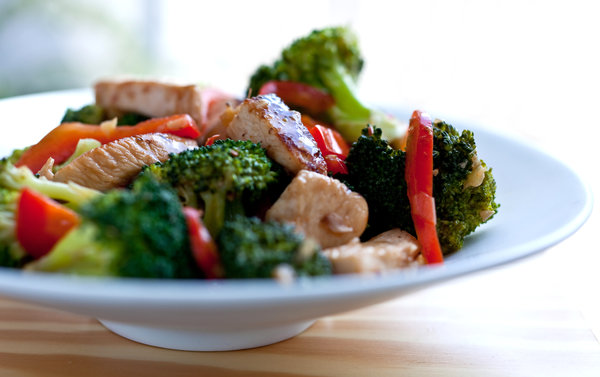
So here’s what I was supposed to make: 

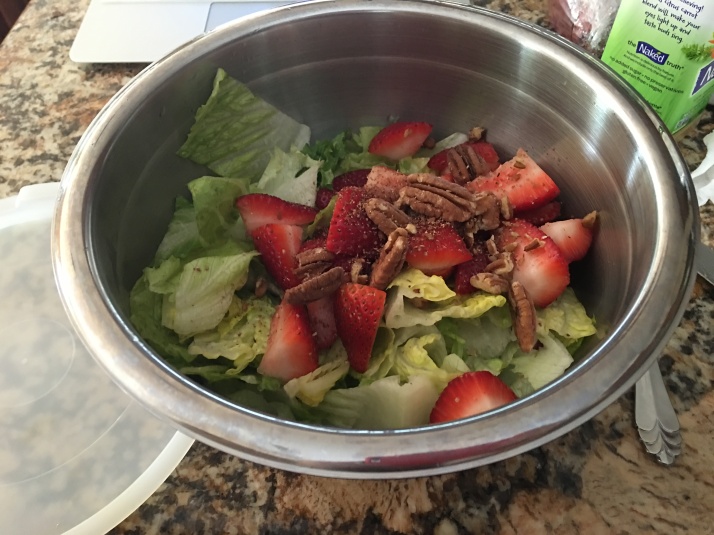
And here’s what came out: IMG_2743

Here’s a link to the recipe for the Fresh Herb Risotto, if you’d like to follow along:

  1. Note to self: if you have less of a major ingredient, also add less of the other major ingredients. Just so it doesn’t look too…much.
  2. This time, I set out each ingredient in little bowls beforehand, so that was good. That’s when I realized that when you’re cooking, the thing that takes the most amount of time is probably preparing the ingredients.
  3. I tried to plan out which pots I needed to make this risotto, but I knew that I was only guessing on how much of each part there would be, even if the serving size was two. For example, I put the chicken broth in a big pot and the onions in a smaller one. Little did I know that I needed to slowly add the broth into the other pot with the onions as soon as it had even more ingredients. So instead, I had to improv. Being a theatre major, I was good at that. Case in point: that very moment. I took out a large pan–a rondeau, it’s apparently called?–and put the onions in there instead. Then, I proceeded with the recipe.
  4. The serving size was originally four, but since it was just me tonight, I cut each ingredient down by half, which made the fractions fun. No, really. I gained back some fraction multiplication skills. “2/3 times 1/2 equals 2/6, AKA 1/3”. (I know, you’d think I’d realize that myself through logic alone, but I don’t math very well.)
  5. Does the rice have to be cooked already? I was assuming so, but it was never specified in the ingredients, so I was stuck wondering until I added the rice into the mixture. My assumption was correct: risotto involves cooked rice.
  6. Our garlic cloves were already minced so I had to guess there too. I just assumed that one garlic clove equaled 1 tsp. Also, when you’re reading the instructions, make sure to read every single word and understand it. That way, when the list of ingredients states 4 garlic cloves, but the first time you use them says you need just one clove, you will actually add one clove. I read the instructions beforehand and actually made a mental note when I read “remaining three cloves of garlic” in Step 3. I forgot, so once I came across that step, I thought, Aaaaaaand I finally screwed up. Instead, I added two more tsp. of minced garlic into the pot. I don’t think it made any difference though. I didn’t taste the garlic.
  7. Stirring the rice was kind of fun though. Because of the broth (I think), when it stuck to the pan, it was really easy to detach. Plus, the chicken stock was absorbed by the rice so quickly that I had fun adding even more broth.
  8. The green leaves I used were basil and parsley and we ran out of both bottles. We had extras, except the ones I used up actually said “fresh leaves” on the labels, but I didn’t use the others. I still feel as though the amount I had was too much. It tasted like seaweed, which is good, because seaweed paper is a delicious side for a Korean meal. I’m just not sure if I liked it for the risotto.
  9. How does one cut up lemon skin in order to make “zest”? What I did was peel some of the skin off with a potato peeler, and then chop it up. And, you know, I feel that although there was less of this ingredient, it was probably the flavor that stood out the most. Besides salt.
  10. Oh, and as I was peeling the lemon skin, I thought to myself, Wanna know what’d be totally fun right about now? Breaking skin. (Sarcastically, of course.)

When I first decided to make this, I wanted to be all “The Fault in Our Stars” and taste the goodness of the risotto that Hazel Grace and Augustus Waters ate in Amsterdam. I even had fizzy white wine, which is close enough to champagne (although I decided not to drink it because I was planning on going for a walk later, which didn’t happen anyway). The Dutch risotto was not as…what’s the word? Green. Not that specific risotto anyway.

As I was washing the dishes, this thought occurred to me: every time I made something, my mom was always surprised by how much of an ingredient it required to make the recipe. It was weird because I figured she’d understand–she’s the one who cooks dinner every day (or at least she was). Instead, she kept encouraging me to just cut each ingredient down to half, but you probably know me by now (at least after reading point number four of this entry): I don’t math very well. Plus, as evidenced in point number six, my memory ain’t so hot either.

Like right now. I was going to make a really good point with that thought process as I was washing dishes, but it has completely escaped my mind. Meh, hopefully it’ll get back to me before I click “Publish”.

At the very beginning, one of the first things it says is “make sure that it is well seasoned”. All I did was add 3.5 cups of chicken stock into the pan. What is there to season? How do I know what it’s supposed to taste like? Can someone please tell me why that direction is there? I mean, when it’s written in Step 4, I get it–the dish is almost done and at that point, you perfect the taste. But what is the chicken broth supposed to taste like when literally all it’s doing is just simmering? I don’t know…

Oh, after adding the notes about the lemon skin, I finally remembered: so why does…aaaaand I lost it again.

Wait, I got it! And it turns out it had nothing to do with the dishwashing daydream! So when you’re looking at specific ingredients, you try to get exactly what they say and how much. Then, you try to read the instructions thoroughly and see if you can replicate what they did. But when something goes wrong, do you find yourself pointing fingers at yourself, or is there a tendency to blame something else? For example, the rice I used was the batch that we already had–extras from last night’s dinner. That’s the only rice we really have, especially the one that was already cooked, so I figured I might as well use it. The list says, however, to use “arborio or carnaroli rice”, specifically. Was that a factor? Did I really need that type of rice?

Having double the minced garlic was probably a factor too.

Or double the lemon zest. (I was so preoccupied with lemon peeling that I wasn’t aware that it was only supposed to fit into half a tsp.)

Too much green.

Got carried away with the salt.

So how do we know what exactly went wrong? The only way to look back and see what could’ve went wrong is by memory, but I suppose that’s why we practice. When we fail, we shouldn’t just give up. We try it again, like I said with the science experiment analogy; we make appropriate adjustments and see if this time was any better. I suppose that’s what they mean when something is (or isn’t) an exact science: you can’t always get it right, but you can certainly up your amount of attempts till you get it right.

Out of 47 ratings though, and two reviews (both very positive), this dish has an average of five stars, so apparently I’m the only one with issues.

Oh wait…maybe the leaves were supposed to be literally fresh, not from-a-bottle-that-says-“fresh”…

P.S. For lunch, I tried making the breakfast sandwich the way my school did it (hey, I usually wake up at 10, so at that point, lunch is breakfast). I think it was egg, ham, and cheese (from bottom to top). The texture was different, I think, because I didn’t cook the ham. I still feel as if something was missing though. I will figure it out. In the meantime, I wasn’t going to share this, but since I already took the picture…: IMG_2737


4/23/16

IMG_2720

AND I’M BACK IN THE GAME!!!!

What we have here is my pathetic attempt at Chicken Stir-Fry with Fresh Vegetables (which is actually “Stir-Fries with Fresh Vegetables” on the NY Times Cooking site, where I got the recipe). Since my mom tells me that “it’s my call” because I’m the chef, I decided that this would be best eaten mixed with rice.

Except…05recipehealth-articleLarge-v2.jpg
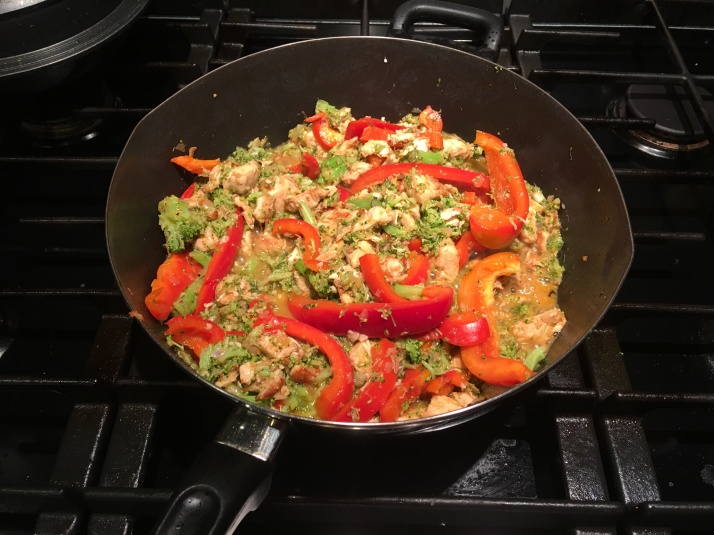
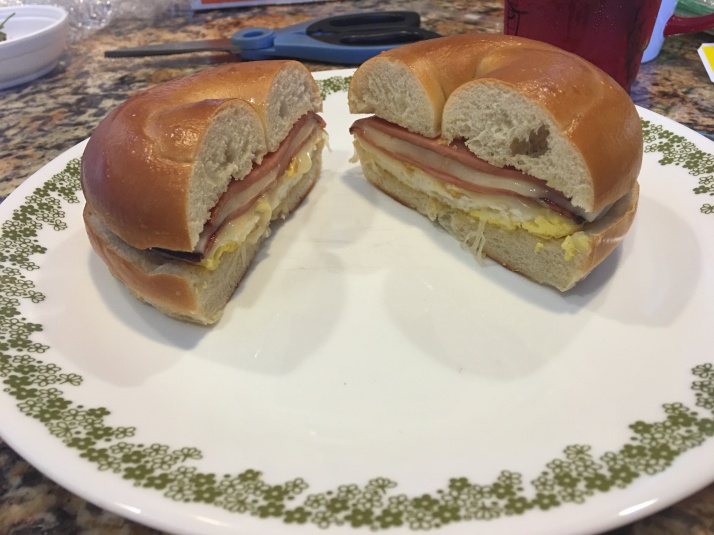
DOES THAT LOOK LIKE IT WAS MIXED WITH RICE TO YOU???

So I think the rice was suppose to be in a separate bowl and we’re supposed to eat the stir fry like a salad. I mean, it tastes fine my way. It actually tastes better than the instant stir-fry crap where all you have to do is microwave it and dunk the veggies in the broth and mix. Poseurs.

Here are a few observations that I, the inexperienced chef, came up with during this process:

  1. The chicken stuck to the bottom of the pan even though I added oil. I guess I was supposed to add more? While stirring it, I literally had to scrape it off, which wasn’t too hard to do. It just took up about 30 seconds of my time.
  2. IMG_2719
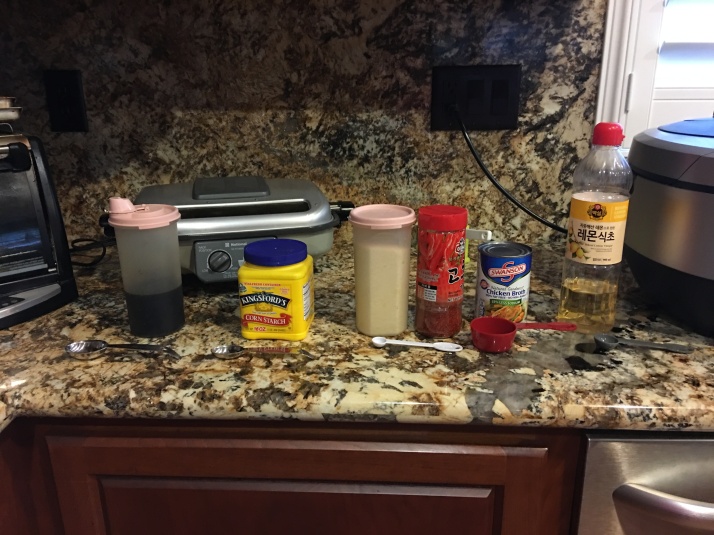
Ain’t it purty? I organized each of the smaller ingredients that I needed, in the order I needed them, and set the appropriate measuring utensil in front of each of them. This system wasn’t too significant, but I did have an easier time once I got around to them on the instructions.
  3. The recipe said to cut the chicken a certain way, by length and width. I feel like that’s impossible with raw meat, isn’t it? It’s just too…mushy, I guess? And with the way I gripped it and cut it–it was just a mess. I didn’t even try at all.
  4. I added double the shallots by accident even though I only needed one. That’s because there was a two-for-one deal at the grocery store, so I figured it wouldn’t hurt to get the extra. Although I only needed the one, I guess, so I don’t know who won when it came to the sale. Then, when it was time to open the shallots, I forgot I was saving one and started opening the second anyway. I don’t think it mattered though. I could barely see the shallots anyway.
  5. In culinary terms, “blanching” means to boil it, then immediately dunk it in ice water. I think. Part of the issue with the broccoli was blanching it, I think. The reason why it looks more like pesto rather than actual broccoli, is because I boiled it in water too much. It was already falling apart after the first time I drained the hot water. I realize they only make you do it twice to clean it, except the broccoli came clean and ready to eat–it even says so on the bag!
  6. Is there a video on how to cut bell peppers julienne? Oh, and how to cut chicken into certain sizes?
  7. My feet didn’t hurt as much this time, but I think that’s because I sat on a stool throughout most of the chopping.
  8. I’m not sure if I mentioned this in a previous entry, but before the cooking officially begins, I’d definitely set the smaller ingredients (i.e. spices, liquids) in their own tiny containers. That way, they’re ready for you, which is why I suppose they do it on those brief cooking clips you see on Facebook, with fun music playing in the background. There are only so many containers you can put them in, and some ingredients include tiny portions to the point where it’s like a waste of a container. So it’s like…what do you do? Waste the entire container or mix it with another ingredient that goes in the bowl at the same time?

So…I think those are all the thoughts that this amateur chef came up with today. I’d say that as far as serving size goes, this was the perfect amount. It was for three people and there were no leftovers, considering the fact that we have dogs and there was chicken in the recipe. So, naturally…they get a lot of the meat.

Oh, and the reason why I didn’t cook the rice (although I technically did, last night) is because they were already prepared. We’re Korean, so having rice ready to go is sort of our thing. Stereotype? Maybe. But is it true? Definitely.

I also have a question for you readers: would you like me to give you the recipe to what I’m cooking so you can, I don’t know, follow along? At least a link to it? I feel like it’d make more sense to you rather than me just telling you certain questions I had because you’re reading these blindly. Let me know what you think! 🙂


4/21/16

We had Indian for lunch today, which blended into dinner, so I didn’t get to cook today either. Definitely tomorrow though. My dad has wanted skirt steak since last night, so it should still happen. Preparing it shouldn’t be too hard though. The way we eat it involves wrapping it in a lettuce leaf with rice and pepper paste–the Korean way to do it, I suppose. What do other people eat with skirt steak?

I still wanted to talk about something though. I don’t have a specific topic in mind, so if someone has an idea, I’d be open to sharing my thoughts. I’ll eventually think of something though, if that doesn’t happen. Go ahead; the floor is open!

4/20/16

I didn’t cook yesterday because there was a lot of food left over, and my dad had a meeting, so they took care of dinner for him there. Instead, I ate some leftover tomato and basil soup with French bread. No cooking today either, since my parents decided on takeout. I’m still tempted to make something though.

Any suggestions? Perhaps trying out the way I remember my school made breakfast sandwiches? Or maybe I can try out a dessert. Do any of you readers out there have any ideas? Go ahead and make your contribution in the “Comments” section!

4/18/16 Part II

So apparently, my cooking for today didn’t stop at that breakfast sandwich. At around dinnertime, my parents were waiting for me to make dinner while I was waiting for my mom to call me downstairs to eat. Nope. They assumed I was going to cook something and decided that from now on, I was in charge of meals. I’m glad, since it means they like my cooking (or at least can tolerate it and figured my mom should take it easy on making dinner now). That’s when I thought, Maybe this new rule isn’t so bad after all. It’d give me a lot more to talk about on my amateur chef’s blog! (That’s you guys! 😀 You’re the blog! Actually I’m the blog, but I write for you! Okay, I only write for myself and only hope that you read them.)

That’s why I’m in the kitchen, waiting for our steaks to cook. I looked for a good ten minutes on quick and easy recipes since this dinner was last-minute, but I ended up going for a simple steak with a side of green beans and rice–also known as, my favorite meal. Whoops, just realized one of my steaks was on sideways. The steaks I bought were small enough to fit three into a long foam plate, so they weren’t too big. I figured my mom would be happy with those sizes because they’re so small.

Instead, she said that she wasn’t eating because she wasn’t hungry. Then, as she smelled what was coming from the kitchen and heard what I was doing, I suppose the atmosphere reminded her stomach that she was hungry. So instead, the two steaks I was making for my dad and myself ended up for both my parents. Right now, I’m working on my own dinner.

For the steak, I guess I’m not really following the recipe as much as I am only using it as my guide. It’s the one from The Blue Bloods Cookbook, because they actually gave me a chart for how long I should cook the steak. Actually, they gave me a temperature number for each option: we all prefer medium-rare, so all I had to do was take an instant-read thermometer (which I just found out we had, and therefore used), and make sure it reads 130°F. (By the way, the ° sign on Macs is option + shift + 8. You’re welcome, students.)

Reading this thermometer though, I can’t help but wonder: Is this what medical examiners use when they measure a corpse’s liver temp? Except their thermometer is probably sharper in order to pierce flesh. Yeah, if you’re eating while reading this, you’re welcome! Sorry for the gruesome question, but I’m a crime show fanatic, so my stomach is pretty strong.

IMG_2668
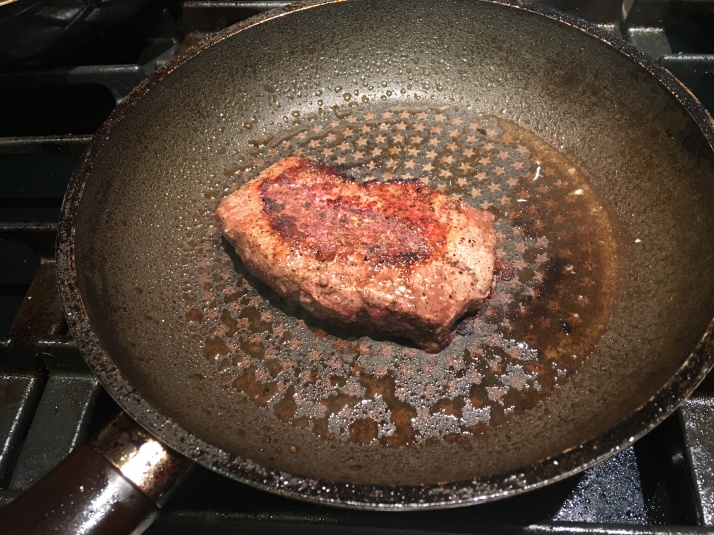
Am I doing this right? I mean, outside the dry center, it looks pretty juicy, but is that center normal? Like, does it need lotion or something?

Well, salud.IMG_2669
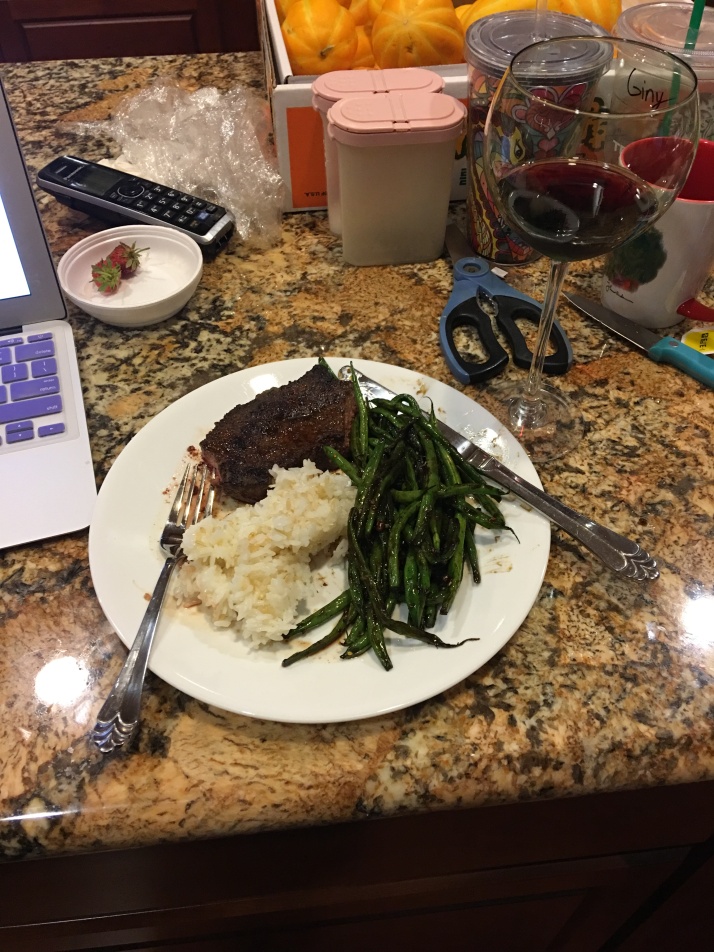
WHOA, that steak is salty. No A1 Sauce needed here. The first bite sorta hurt. The ones after weren’t too bad, but I think it’s because my taste buds adjusted. Or suffered paralysis from shock.

IMG_2670
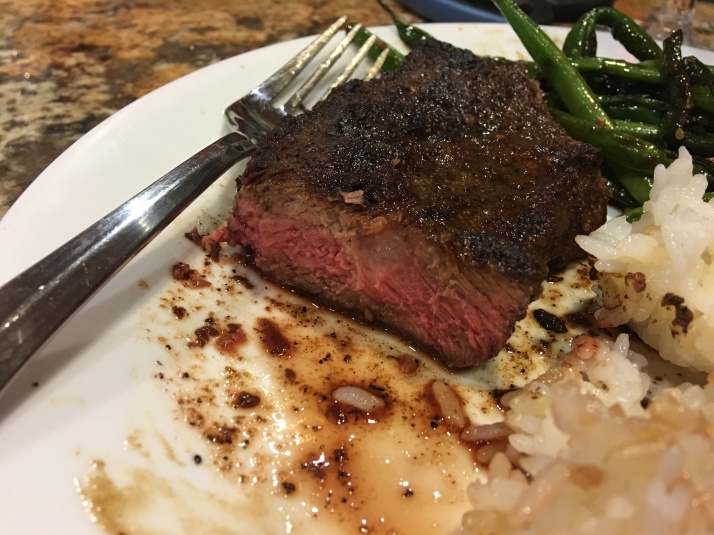
So this is what 130°F got me. Again, thank you, Bridget Moynahan and Wendy Howard Goldberg for that helpful chart in The Blue Bloods Cookbook. I also just learned how to use an instant-read thermometer, so thank you for that as well, ladies.

I hope this is okay, but here is the chart they so graciously published: Screen Shot 2016-04-18 at 10.05.08 PM

I think by “rest”, they mean let it cool down anywhere but where the initial heat source was, which I didn’t do.

As for the green beans, I remembered from last time that my mom uses oyster sauce when she makes them. I looked up recipes for green beans that include oyster sauce and found one on Rachael Ray’s website called Stir-Fried Green Beans with Garlic & Oyster Sauce. It was really simple and pretty close to what Mom makes, so I’m definitely keeping that one for my personal cookbook.

FYI, I live in California, so we go by Pacific Time, which is why it’s published for April 19th. Is there a way to change that, by the way?

4/18/16

You know, I never realized this about cooking: even if you’re following a published recipe, it’s exactly like a science experiment. Think about it: let’s take a look at the scientific method:

  1. Question: “Which recipe should I use?”
  2. Research: “I have a bunch of options, so I need to narrow it down by specifics.”
  3. Hypothesis: “I think this recipe will work best for me.”
  4. Experiment and Make Observations: “Let’s try it and make sure it goes perfectly.”
  5. Did it work?: “Was it right or did it have flaws? If so, what were they?”
  6. Adjust: “More of that, less this.”
  7. Test again: “Will this round be better?”
  8. Rinse and repeat as necessary.

Isn’t this so true though? I thought of it after the conversation my family had about the cake yesterday. “Too sweet.” “Use olive or canola oil if you’re going to use the entire bottle, because avocado oil is expensive.”

Anyway, back to business: today is going to be an easy culinary day. Instead, I’m going to provide a recipe for a ham and cheese sandwich that I personally love (or at least figured out myself). Of course, this meal is one of those dishes that works best by preference, so you can go with other choices of meats and cheeses. This is just what I usually make myself.

This recipe is based on what my high school would typically serve for breakfast. It was a plain bagel with fried egg, ham, and cheese. Or was it turkey and cheese? Either way, this is what it’s based off of. It doesn’t taste exactly like what they served in school, but it’s pretty darn close.

Ingredients:

1 plain bagel

1 or two slices provolone cheese (I get the reduced fat from Lucerne Dairy Farms)

1 or two slices Beef Bologna (Again, I get the light version because it has 50% less fat)

1 egg


Instructions:

  1. Slice the bagel in half and leave it open.
  2. On a medium-sized fry pan, in medium heat, apply a little bit of olive oil–not too much or too little; just enough to make sure it doesn’t stick…or whatever olive oil is supposed to do. Too much oil might cause it to burn you when your ingredients pop. At least I think that’s why I kept getting hit with pops of oil.
  3. Apply the egg and let it run (as in you can poke the yolk).
  4. In the same pan (but kept separately), add the ham.
  5. After a minute or two, flip all your fried ingredients. Flip them a couple more times until you think they’re ready. (And make sure that you’ve got your cheese slices ready too, because it’s a lot better when they melt at first touch, like you and your true love <3<3 .)
  6. As the egg is running and setting into what it’s officially going to look like once cooked, gather up all the yolk and make sure the shape is somewhat a circular blob. Then press down with the spatula as a way to, I don’t know, make sure it stays that shape. Then, I flip it and make sure the other side gets it too. It creates an ugly indent of the spatula shape, but you’re not gonna see the entire egg since you’re going to be eating it in a sandwich. (Even if it’s pretty, you’re there to eat it, not stare at its pretty face.) Don’t forget to flip the meat as you’re doing this too.
  7. Now, place the finished egg on the bottom half of the bagel. Then, place a cheese slice on top. Add a slice of ham, another layer of cheese, another layer of ham, and press the top half of the bagel down. (Bonus points if you match both halves to their rightful place!)
  8. Cut it in half and, if you’re fine with eating it like this, then bon appétit! If you think you’d like the entire sandwich to be warm, microwave it for 15-30 seconds. And then bon appétit!

We freeze all our bread so it doesn’t grow mold, so what I have to do first is microwave it for one minute, if all I want is the bagel. If I’m prepping it for the sandwich, I microwave for 30 seconds and then start the recipe. When I’m done making the sammy, I cut it in half and save the other for later (so cover it with Saran wrap and place it in the fridge).

FYI, I literally just put this recipe together based on what I usually do, and set more specific limits by going along with it. (I guess I’m set for dinner.) That means that it’s not the official recipe I’m going with. Even if it is the most perfect recipe for me, it probably won’t be for you since you and I have different tastes. That’s why you can add whatever ingredients you’d like to your individual bagel sandwich preferences. This one is mine, which I am suggesting you try.

That being said, I know this isn’t some fancy meal, or even a unique idea. Whatever version of this you’ve been doing, keep it if it works for you. I mean, there may be an intricate version of this that the professionals use. This way just works for me, but if there’s a better way for me to make the ham, egg, and cheese bagel they once made in school, I’m all for that.

Now that I recall though, they never cooked the ham… It was just the plain bagel with cheese, ham, and egg (in order from top to bottom) and they’d microwave it for 45-60 seconds. I’m confused. I’ll try that next time and get back to you. Till then, my friends, The Breakfast Sandwich:IMG_2665

4/17/16

 It is time. For the final step.

Last time I wrote with icing, my dad told me to practice it on a plate first before proceeding to the actual pastry, which is the best tip a baker could receive, if they’re going to design cakes everyday. Why? Today, after one fat “Happy” on an everyday plate…I had to go to the store to find something skinnier. Then, I saw that they had one of those caps that made the icing smaller, so I bought a set of those instead, since my mom told me we didn’t have any. As soon as I returned home, I applied the shrinking cap and practiced once with it on the plate. Beauteous.

So here is the very final product of this nearly-24-hour journey:

 Perfect. It now looks like Hagrid from Harry Potter made it. (“Happee birthdae Mommy.” I’m looking at a screenshot of the cake right now. That’s how he misspelled it, I promise.)

You’d think you’d remember that icing is edible, even if it’s used on a practice plate. Yum… Frosting is the best. (Icing is frosting, right? Just used for writing? That sounds about right.)

I found the easiest way to write with icing is if you clench up both fists around the tube. (I suppose that’s why the pros do it.) Since my right hand is my writing hand, I preferred having that closer to the tip, to give off the feeling that I was writing with an ordinary pen. Like a child would with a crayon, at least. Then, stand directly above the pastry and begin. (I’m 4’11”, so you could imagine how childlike I looked, still standing on my tippy toes.)

By the way, always a good idea to tie your hair up. Not only when you’re baking, but with cooking as well. Don’t want to shed in your own food. You’d think it was common sense, but people shed unknowingly all the time, so they don’t think about it. You don’t have to go as far as using a hair net, just keep it back; make sure it stays up and out of the way.

Oh, and yes, I intended on dotting the “i” with a heart. Did that translate? At all?

I suppose that’s it for today. We’re going out for lunch and dinner, so not much cooking for me to do there. Except maybe applying more salt to my meal or something. And not even that counts. My work here is done.

Besides eating it, of course. Apart from “the frosting was way too sweet”, there were zero complaints. We spent the day with my older sister who said that red velvet cake was her favorite, which was why she was excited about dessert. All anyone could have was a single slice, because “the frosting was way too sweet.”

When she asked what made the red velvet red velvet, she guessed, “Food coloring?” I thought about all the ingredients and said, “Yeah, actually. That’s the only part of it that’s red.” Other than that, it was your typical cake–except probably more moist, which was intended–except red.

So I’d say this cake thing was a success! 🙂 Something to think about though is how to have the same texture for the frosting, but with less sugar. Is there a way to figure that out? There were two whole cups of powdered sugar. (Although I might have added a little more than that because I didn’t want to make a huge mess by flattening the mountain that formed in the measuring cup…yeah, that’s why there was so much. Let’s go with that.)

Overall, I think the biggest issue was probably the frosting. Instead of using butter, I substituted oil. Because of the slippery texture, it was difficult to cover the entire cake. Clumps kept sliding around; it was so annoying.

The second biggest mistake was forgetting to grease and flour the cake pan before pouring the leftover batter. I managed to save it though by putting it on top of the successful half (although in this case, it was more like the successful 2/3).

Before I officially sign off for the night, here are a couple of photos of what the cake ended up looking like on the inside: